- Thread Author
- #1
What is a DNS leak and how to fix it

When connecting to a VPN server in some operating systems (for example, Windows), requests do not always pass through the DNS server of the VPN connection. In this case, some sites may find out that your IP address and DNS servers are located in different countries, and your anonymity may be compromised.
What is a DNS server?
The main purpose of DNS servers is to translate domain names of sites into IP addresses that these domains are assigned to. In simple words, by entering the domain in the browser Google.com, The DNS server looks at which IP address this domain is assigned to, and the site page loads via IP addresses.Below is an example of defining DNS servers on a site Whoer.net.
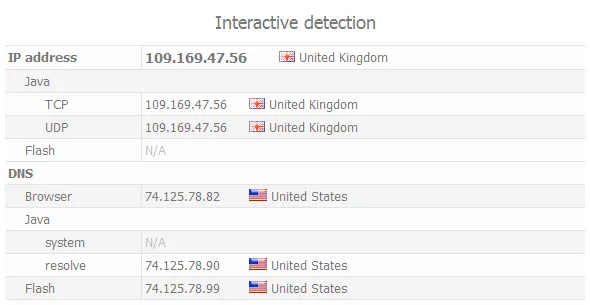
DNS leak - displays the real DNS server of the Internet Service Provider
The example shows that we connected to a VPN and hid our IP address (the IP belongs to the UK), but the DNS server gives us our real location (USA).
In this case, the problem lies in the principle of operation of the Windows DNS service. When connecting to a VPN, by default, the request is sent to the DNS of the VPN server. Then the Windows DNS service waits for 2 seconds, and if no response is received, it sends a request to the next DNS server in the Windows OS list. Just the following DNS servers belong to your Internet Service Provider, but they have a lower priority than the DNS of the VPN server.
The DNS of the VPN server may not be able to respond to the request in time due to the geographical distance of the VPN server from you, while the DNS server of your provider is located in your city. This may also be affected by the quality of signal transmission from your Internet Service Provider to the VPN server.
Solution: force using the DNS server we need. In this case, we will clearly indicate to the operating system that you need to use only the specified DNS servers, and then the DNS servers of your real provider will not appear in the Windows DNS service list.
How to hide your DNS in Windows
How to hide your DNS on Mac OS X
How to hide your DNS in Ubuntu (Linux)
How to hide your DNS in server Linux
Our Secure Kit VPN client is able to protect against DNS leak automatically. Learn more about the Secure Kit.
How to hide your real DNS in Windows
Follow these steps on any version of Windows.Right-click on the Windows network connection and then select Properties.
Specify the Google or OpenDNS public DNS servers.
Google DNS:
- 8.8.8.8
- 8.8.4.4
OpenDNS:
- 208.67.222.222
- 208.67.220.220
These DNS servers are most often defined as the United States. In this case, no site will issue your real DNS.
For complete anonymity, we recommend using our DNS servers. The "My Account" section lists DNS servers for each VPN destination. And even in this case, your DNS server will always match your IP address (by country).
After completing these steps, your real DNS server in Windows will be hidden.
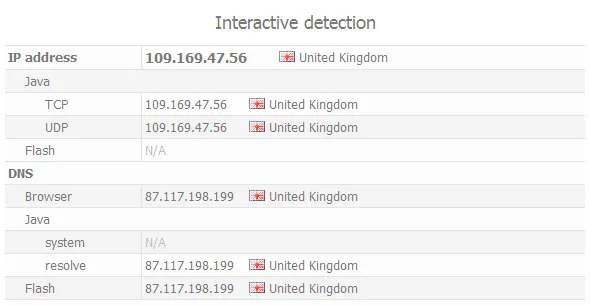
Real DNS is hidden and DNS leak is eliminated
How to hide your real DNS on Mac OS X
To force DNS installation on any version of Mac OS X, follow these steps::In the next window, click on the lock icon at the bottom to allow editing the settings. You will need to enter your Mac OS X account password.
Select the connection that you are using to get the Internet. This is usually either a Wi-Fi connection or an Ethernet connection. And then click on the "Advanced" button.
Enter the Google or OpenDNS public DNS servers.
Google DNS:
- 8.8.8.8
- 8.8.4.4
OpenDNS:
- 208.67.222.222
- 208.67.220.220
These DNS servers are most often defined as the United States. In this case, no site will issue your real DNS.
For complete anonymity, we recommend using our DNS servers. In your account, in the "Subscriptions" section - > "DNS" tab, DNS servers recommended for use with our VPN servers will appear. Each VPN destination will have its own DNS server specified. And even in this case, your DNS server will always match your IP address (by country).
After completing these steps, your real DNS server on Mac OS X will be hidden.

Real DNS is hidden and DNS leak is eliminated
How to hide your real DNS on Ubuntu
To resolve a DNS leak in the Linux-based Ubuntu operating system, open the Connections section.Select your Internet connection and click Edit.
Choose:
- The IPv4 Settings tab
- Automatically (DHCP, address only)
- Specify the DNS server. For example, you can use public DNS servers from Google or OpenDNS
Google DNS:
- 8.8.8.8
- 8.8.4.4
OpenDNS:
- 208.67.222.222
- 208.67.220.220
On Linux, you must restart your network settings for the changes to take effect.
Click on Network Management.
The Connection terminated message appears.
Then click on Network Management again to enable the connection.
After these actions, your real DNS server will be hidden.

Real DNS is hidden and DNS leak is eliminated
How to hide your real DNS on server Linux
Follow these steps only if you consider yourself an experienced Linux user. We warn you that making changes manually is dangerous if you have little knowledge of Linux administration. Please note: We do not accept any responsibility for the consequences.Log in to the server as root (or as a regular user, but you must have privileges to execute commands under sudo).
Enter the following command. You may need to enter your OS account password. For editing, use the nano text editor. If you don't have it installed, then make changes with another editor or install nano.
sudo nano /etc/resolv.conf
Edit the resolv. conf file to resolve the DNS leak on Linux
- If you have resolvconf installed, then this file will contain a message that after the OS is restarted, all changes in this file will be lost and the settings will return to default to 127.0.1.1.Since we are changing the DNS server temporarily, this is fine with us.
- Write down the default DNS server specified in this file. Then change the DNS server. For example, you can take a DNS server from Google or OpenDNS.
Google DNS:
- 8.8.8.8
- 8.8.4.4
OpenDNS:
- 208.67.222.222
- 208.67.220.220
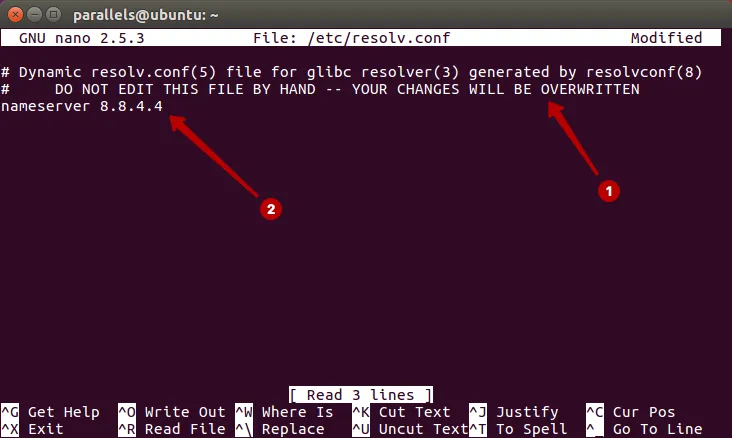
Specify the DNS server to resolve the DNS leak on Linux
To save it in the nano editor, click:
- Ctrl+X to exit the editor
- use the Y key to save changes to the file
- press Enter to confirm saving to the same file
For the changes to take effect, you must restart the network interface.
- for Debian and Ubuntu, enter the command:
- for CentOS and Red Hat Linux, enter the command:
The network interface will restart and the DNS leak will be resolved.
Restart your computer to restore the original DNS server.

Real DNS is hidden and DNS leak is eliminated
Checking and protecting against WebRTC leaks
Let's give a brief overview of the automated service and perform WebRTC leak testing on it.
You do not have permission to view link
Log in or register now.
Local IP 010.3.15.129
It attempts to determine the local IP address via the WebRTC STUN source header, which can be used to check for a local IP address leak by your browser and the VPN service.
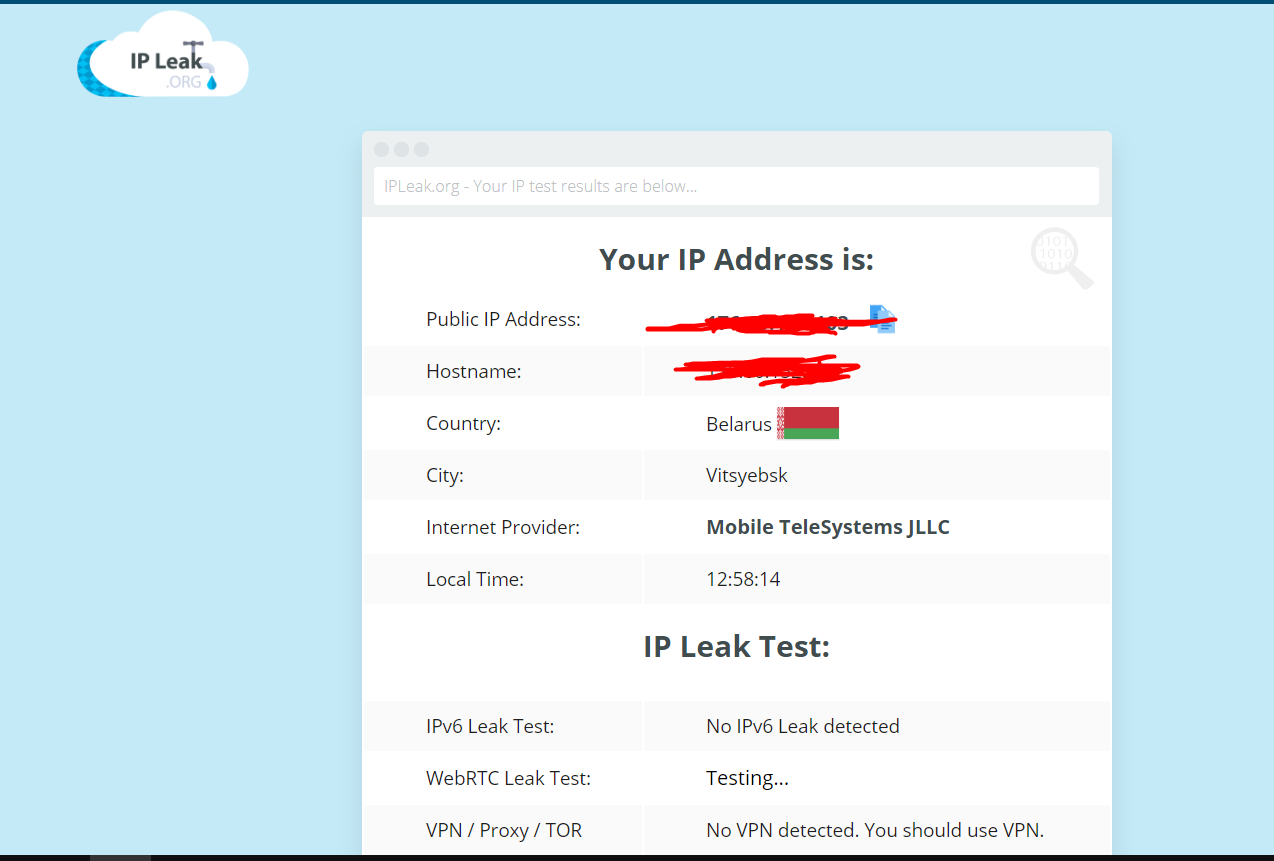
What is WebRTC?
In a nutshell, Web Real-Time Communication or WebRTC is a protocol that allows real-time audio-visual and P2P communication between two or more browsers.The main goal was to improve the functionality of VoIP and browser-based video conferencing.
Later, the project was opened on the initiative of Google, and then implemented by various other companies, including Mozilla in its Firefox browser.
Now WebRTC is used by Facebook, Youtube, Google Hangouts, OpenTok and many others.
You can read more even more, since there is plenty of information on the web.
What is a WebRTC leak?
A WebRTC leak is a type of vulnerability in web browsers that exposes your local IP address via the WebRTC stun source header.The STUN protocol is necessary for smooth operation of WebRTC.
If you don't notice, it's pretty easy to add JavaScript code to a web page and get a local IP address, even if you're using a VPN.

